Context
I spent two days troubleshooting an issue caused by neglecting to download the linux-headers. This wasn’t auto-installed as a dependency by either xpadneo (expected) or DKMS. During the process, I mistakenly assumed a firmware issue and attempted to update the controller firmware through VirtualBox. Unfortunately, I managed to soft-brick my controller, preventing it from appearing on my computer’s or phone’s Bluetooth while in pairing mode. However, I learned a foolproof method to update the firmware through VirtualBox, which I’m sharing here as it might help others facing similar issues.
Controller Model
- Xbox One S controller
- Xbox Elite 2 controller
- Xbox Series X|S controller
- Other
This method should work for other controllers as well.
Steps to Update Controller Firmware through VirtualBox
-
Download Required Tools
- VirtualBox: Install VirtualBox.
- Windows 10 ISO: Get it here from Microsoft. If you are using a Windows device, skip this guide and download Xbox Accessories directly on your system.
-
Set Up the Virtual Machine
- Load the Windows ISO into VirtualBox.
- If an error occurs upon starting up the VM indicating that the KVM module is currently using the AMD-V (hardware virtualization) feature, which VirtualBox also needs, run
sudo modprobe -r kvm_amdto temporarily disable it. - Install Windows, apply all Windows updates, and update the Microsoft Store apps for compatibility.
- Install Xbox Accessories from the Microsoft Store and shut down the VM.
-
Disable the
xpadDriver- If
xpadis installed (it was by default in my case), disable it:- Create a
.conffile in/etc/modprobe.d/(name it anything, e.g.,disable-xpad.conf). - Add the line:
blacklist xpad.
- Create a
- This prevents the
xpaddriver from interfering with the USB passthrough. - Restart your PC after making this change.
- If
-
Configure VirtualBox USB Passthrough
- Open VirtualBox, right-click the newly created VM, and go to Settings > USB.
- Plug in your controller, then click the Add USB filter button and select your controller from the list.
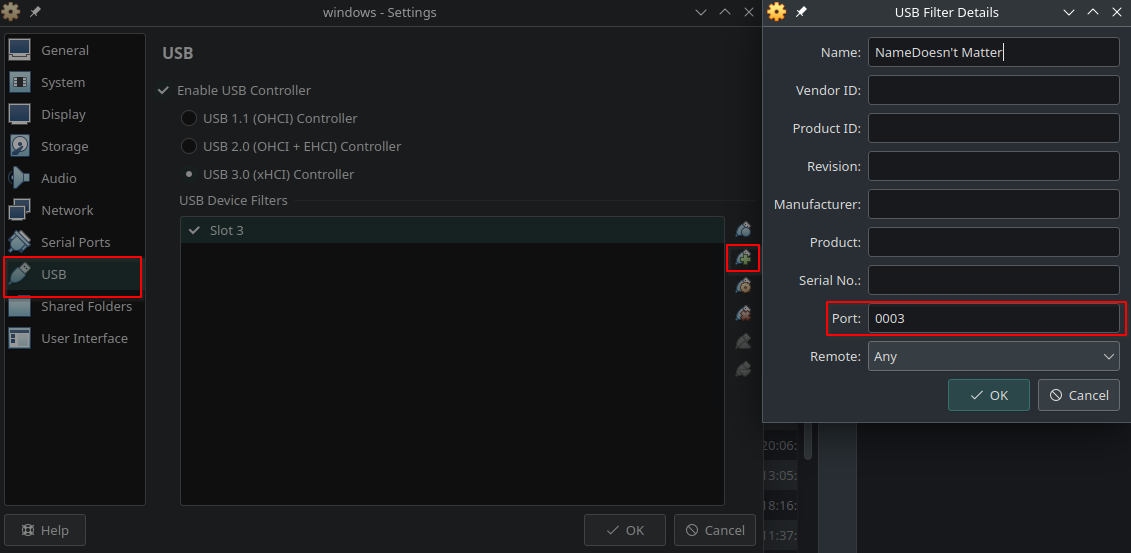
- Edit the new USB filter:
- Keep only the
Port(ensures the controller stays connected during the firmware update) andNamefields, and delete the rest. - Ensure you use the same USB port throughout the process.
- Keep only the
-
Update Firmware
- Launch the VM, open Xbox Accessories, and confirm the controller appears correctly.
- Proceed with the firmware update.
-
Re-enable
xpad(Optional)- If you want to use
xpadagain (e.g., for wired play), delete the.conffile you created in Step 3.
- If you want to use
Credits
This guide is based on the solution provided in xpadneo issue #472.